My husband said something that stuck with me.
Yeah, go figure.
Seriously. He said the last bastion of good packaging is in luxury goods.
Remember your first iPod...or iWhatever? The box, the way it was placed inside the box which was heavy and beautifully made. The accessories were cleverly placed and the whole look and process of discovering your new toy was pretty special. It helped you feel good about buying such a spendy item. The presentation reinforced the luxury status of the Apple brand. It's exclusive, but in a good way. The receiving should be a continuation of the joy of purchasing.
I had a similar experience when I ordered a camera tote bag from a small, specialty designer. It came in a lovely presentation box with tissue, ribbon and a note. By extension I felt privileged and appreciated. And who doesn't love that?
As part of any business that sells a tangible thing, I needed to plan my packaging strategy. I looked at lots of pictures. Evaluated options. Weighed costs.
And then I decided traditional jewelry boxes were kinda dumb.
I have thrown away dozens of cute little white, black, purple or brown craft paper boxes.
They are useless. They are clutter.
Beyond the initial presentation, what are they good for?
Being a practical woman I thought about what I'd rather have. Something I could enjoy opening and seeing my jewelry in for the first time. Yes. That's a must. Jewelry is a luxury item no matter what the price of the piece, so making my buyer feel special is important.

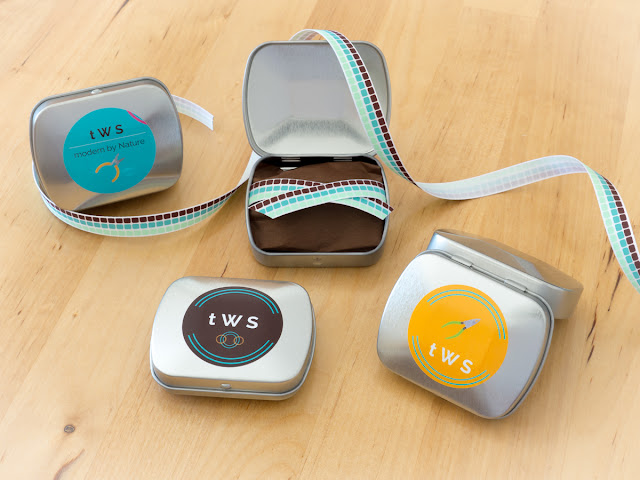
The idea of re-usability kept niggling me. Then I hit on it. How about a cute little tin? Over the years I've kept a few Altoids tins because they're so clever and useful. Why not try it? I found a place online that sells in smaller quantities than whole cases and I got two sizes to use. I also designed and ordered a couple of sets of stickers to use on the tins and other promo items.

Plus the jewelry inside would be well protected on its way to her. You know the mail service is none-too-gentle. Not only could a metal box be useful to the woman who receives it, but it could remind her of my brand and her jewelry purchase. Every time she takes it out of her purse to get her earbuds, she'd get a little pop of the Wire Smith.
But a tin alone is just too sterile. Too harsh. It needs a bit of softness. Enter ribbon and tissue - staples of handmade jewelry makers everywhere. It isn't exact, but the tissue and ribbon I found is very close to my brand colors and I can always branch out to the others in my palette.
So I'm very pleased with what I've put together so far.
Yeah, go figure.
Seriously. He said the last bastion of good packaging is in luxury goods.
Remember your first iPod...or iWhatever? The box, the way it was placed inside the box which was heavy and beautifully made. The accessories were cleverly placed and the whole look and process of discovering your new toy was pretty special. It helped you feel good about buying such a spendy item. The presentation reinforced the luxury status of the Apple brand. It's exclusive, but in a good way. The receiving should be a continuation of the joy of purchasing.
I had a similar experience when I ordered a camera tote bag from a small, specialty designer. It came in a lovely presentation box with tissue, ribbon and a note. By extension I felt privileged and appreciated. And who doesn't love that?
As part of any business that sells a tangible thing, I needed to plan my packaging strategy. I looked at lots of pictures. Evaluated options. Weighed costs.
And then I decided traditional jewelry boxes were kinda dumb.
I have thrown away dozens of cute little white, black, purple or brown craft paper boxes.
They are useless. They are clutter.
Beyond the initial presentation, what are they good for?
Being a practical woman I thought about what I'd rather have. Something I could enjoy opening and seeing my jewelry in for the first time. Yes. That's a must. Jewelry is a luxury item no matter what the price of the piece, so making my buyer feel special is important.

The idea of re-usability kept niggling me. Then I hit on it. How about a cute little tin? Over the years I've kept a few Altoids tins because they're so clever and useful. Why not try it? I found a place online that sells in smaller quantities than whole cases and I got two sizes to use. I also designed and ordered a couple of sets of stickers to use on the tins and other promo items.

Plus the jewelry inside would be well protected on its way to her. You know the mail service is none-too-gentle. Not only could a metal box be useful to the woman who receives it, but it could remind her of my brand and her jewelry purchase. Every time she takes it out of her purse to get her earbuds, she'd get a little pop of the Wire Smith.
But a tin alone is just too sterile. Too harsh. It needs a bit of softness. Enter ribbon and tissue - staples of handmade jewelry makers everywhere. It isn't exact, but the tissue and ribbon I found is very close to my brand colors and I can always branch out to the others in my palette.
So I'm very pleased with what I've put together so far.

I haven't done any photos of the larger size yet, but I'll get to it. For now I'm adding one of these images to my product listings so people will see how they will arrive.
It looks like things are coming together!!
Comments
Post a Comment